Configuring Deja Dup Ubuntu backup on a WD My Cloud NAS
Dec 4, 2019 11:05 · 842 words · 4 minute read
Considering that the sole purpose of Deja Dup is to backup and one of the main selling points of a WD My Cloud NAS drive1 is as a place to store your backup; it is surprisingly difficult to do it in a seamless way on Ubuntu. By seamless I mean it happens in the background without you having to think about it.
This post was originally written in December 2019 for Western Digital’s My Cloud OS 3 operating system and Ubuntu 18.04 LTS. As I write this in February 2021 the current WD operating system is My Cloud OS 5, and of course Ubuntu has also moved on. There might therefore be easier ways to do this - I haven’t checked as this method still works for me. Differences for both OSs are shown below.
1. Install the NFS client
Install the NFS client package by running the following at the terminal:
sudo apt update
sudo apt install nfs-common
2. Create a share on WD My Cloud
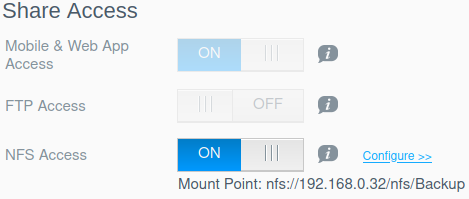
Using the My Cloud interface create a ‘share’ on the WD My Cloud (see About Shares in the User Manual), ensure NFS is set to on and give the share a relevant name (e.g. Backup). Once created take a note of the IP address of the share as shown in the screenshot below (here it is 192.168.0.32, your system will likely be different).
MyCloud OS 5
If you are running the current My Cloud OS 5 (and you should be) then you will see:
In this version of the OS you will need to explicitly enable Write via the Configure » link:
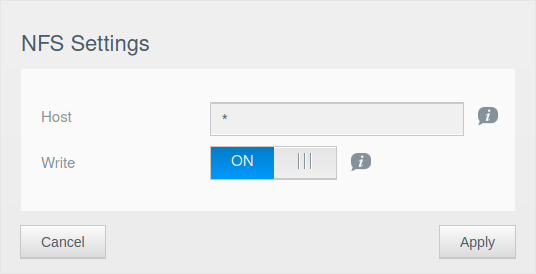
The Host value refers to the IP address on your local network that can connect to the share - leave as asterisk to enable all. Alternatively add the IP address of the machine you are backing up from to restrict access.
MyCloud OS 3
If your NAS is running My Cloud OS 3 then the dialog is slightly different:
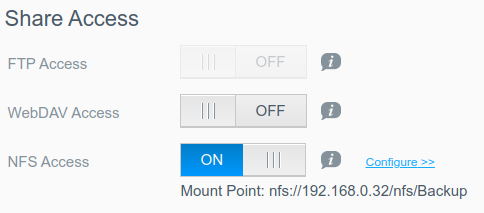
Unlike OS 5 write access is on by default, but it does not hurt to check…
3. Create a local folder to act as mount point
Using the terminal create a folder on the computer you are backing up: sudo mkdir /mnt/Backup. This is the folder you will mount the NAS drive to; you can create this folder anywhere you consider sensible.
4. Open fstab file
Using the terminal open your fstab file using sudo vim /etc/fstab. This fstab file determines what drive Ubuntu mounts at startup.
5. Add new line to fstab file
Create a new line at the end of the fstab file and; where ‘192.168.0.32’ is your IP address from Step 1, the first Backup is the share you created at Step 1 and /mnt/Backup is the folder you created at Step 2; add the following
192.168.0.32:/nfs/Backup /mnt/Backup nfs defaults 0 0
If you aren’t familiar with vim it can be a little tricky to figure out how to edit text and save, but you can pick up the bare minimum quickly.
6. Create /etc/network/if-up.d/fstab file
Using the terminal create a file with the command sudo vim /etc/network/if-up.d/fstab.
7. Edit /etc/network/if-up.d/fstab file
Copy and paste the following text to the file created at Step 5:
#!/bin/sh
mount -a
8. Make /etc/network/if-up.d/fstab file executable
Make the file executable: sudo chmod +x /etc/network/if-up.d/fstab.
9. Mount the drive
Run sudo mount -a from the terminal and the drive should now mount. If you have done something wrong, like entered the wrong IP in fstab, you will get a message similar to mount.nfs: Network is unreachable; success meanwhile is marked simply by the lack of error message. Alternatively you could also reboot your system which has the same effect - although you don’t get to see the error message immediately if there is one.
10. Select backup options in Deja Dup
Open Backups on Ubuntu (although the name is Deja Dup, it is not known as that) and select ‘Storage location’. For storage location select ‘Local Folder’ and then choose /mnt/Backup or whatever folder you chose at Step 2.
11. Back up
Select ‘Back Up Now’ from Overview and set up scheduling.
These instruction borrow heavily from an answer on Ubuntu Forums, which was helpfully reposted on Ask Ubuntu. Linuxize also has a useful post on mounting NFS file systems.
Addendum: The original version of this post used the device name (see Configuring Settings in the User Manual) instead of the IP address in the fstab file. For some reason that I’m not going to dig too much into, this has recently stopped working; so I’m using the IP address instead. Using the IP address has problems too - as they are normally dynamically allocated by a router they tend to change when devices are powered down / reset; in which case the fstab above will need editing. I figure as most NAS drive are on permanently however, this is not too big a hassle - or alternatively you can amend your router to provide a static IP addresses which doesn’t change.
-
Amazon affiliate link. ↩︎